
Recently a customer of ours came to us with a problem, they want to use Amazon SES (Amazon’s AWS email sending functionality) to send WP Email Capture emails to them. They were having a bit of bother setting it up, so came up to us see if we could do this. After playing around with our server and staging site, we managed it! So we thought we would prepare a guide on how to set up WP Email Capture for Amazon SES.

1. Sign Up to Amazon SES
The first thing you need to do before anything else is sign up to Amazon SES. You can do this here. It should be fairly straightforward so when you do this make sure first you know where your box is located (it’s in one of 3 regions), go to the next step!
2. Authenticate Domains & Email Addresses
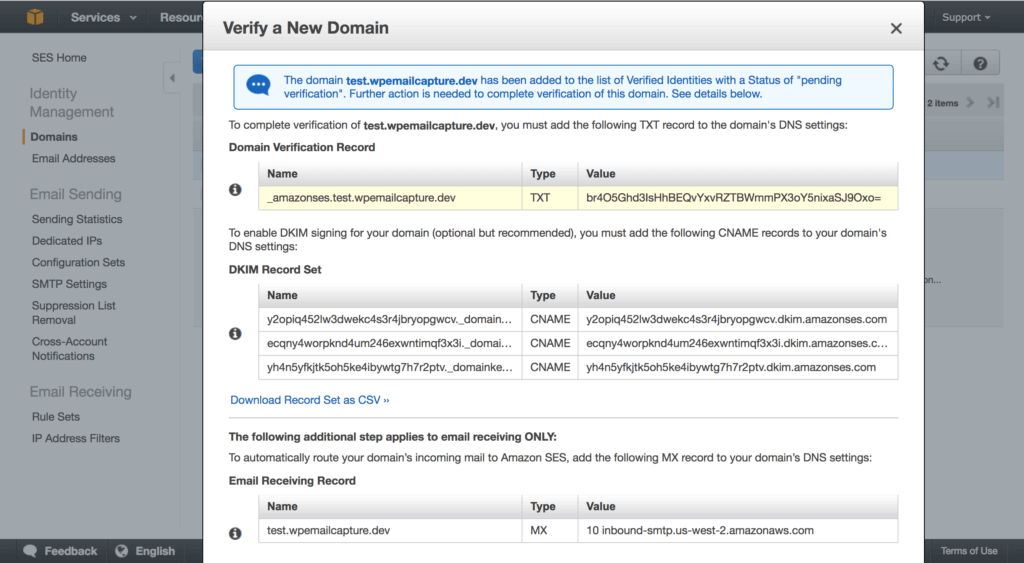
You need to make sure that you authenticate your domains & email addresses that you will be testing WP Email Capture with. To begin, go to the “Domains” tab, and click “Verify a new domain”. Fill in your domain on this screen and click the checkbox next to “DKIM Settings” as well to ensure emails get through. You are given a list of various MX records looking like something like the picture below.
At this point, go to whoever manages your domain and add at least the TXT and the CNAME records. We are unlikely to ever receive email through WP Email Capture, so don’t worry about the MX record too much. In fact, adding it could affect your own MX records already set up (so if you’re using Google Apps, for example), so avoid that record. It is the bottom record in the above screenshot.
Next you will have to verify an email address. This is for testing purposes and also for sending out emails. So makes sure you have an email address that you can read or access. Click on Email Addresses under Identity Management and fill out the email address and click “Verify this email address”. An email should come to you. Click the link in the email to verify the email address, and make a note of the email address.
3. Setup SMTP & Download WP Amazon SES SMTP
Now to send email we need to set up SMTP. Click “SMTP Settings” under “Email Sending” and then click “Create My SMTP Credentials”. You will be given an IAM Username. Click “Create” at the bottom of the screen.

You’ll get a plain blank screen with a bit of hidden text. Click “Show User SMTP Security Credentials” and copy and paste the username and password into a safe place, now we go into WordPress.
For this process, we’ll be using a plugin called WP Amazon SES SMTP. Download it and install it to your WordPress installation in the usual way. Once activated click on the Amazon SES SMTP located on the Dashboard of WordPress. The screen should look like the screenshot below:-
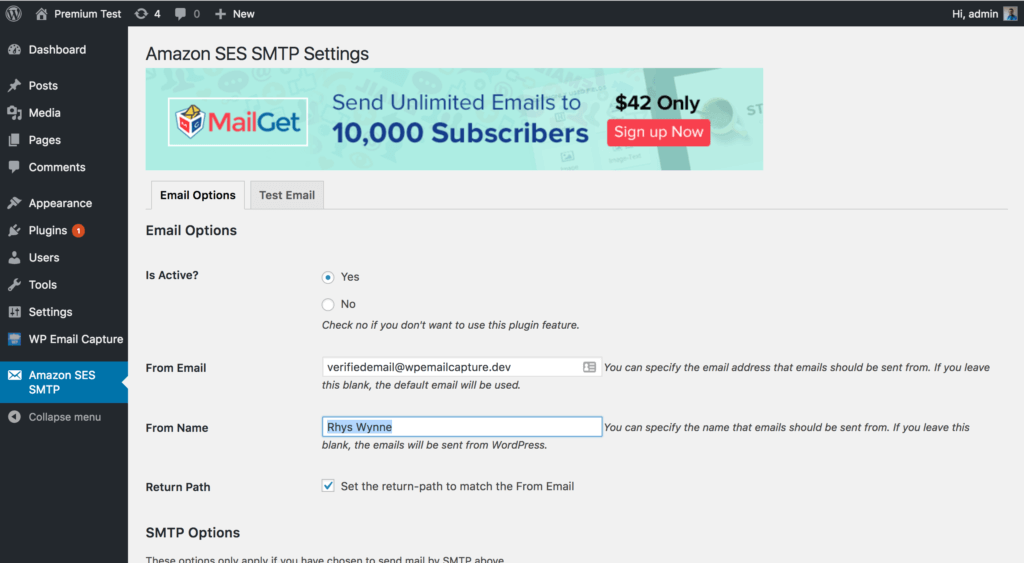
From here, set up the plugin with the following settings:-
- Is Active: Yes
- From Email: The email address verified in step 2.
- From Name: Whatever you wish.
- Return Path: Check
- Select Region: The region you are located in step 1.
- Encryption: Up to you
- Authentication: Yes: Use SMTP Authentication
- Username/Password: The username/password taken from earlier on.
Once that is done, run a test by clicking on the “Test Email” tab. Make sure the email address is the same one that has been verified in step 2. If you get a “Test Message Sent” result, go to the next step.
4. Setup WP Email Capture – Make Sure You Are Sending From a Verified Email & Remove Headers
WP Email Capture won’t work yet, the reason being is either Amazon SES or the WP Amazon SES SMTP plugin sends their own headers. WP Email Capture also sets it’s own headers, which Amazon doesn’t like as it doesn’t know which headers to use. Since WP Email Capture 3.3 though you can send emails without the headers.
In both WP Email Capture Free or Premium, go to “Settings” in the WP Email Capture menu in the Dashboard and make sure you tick the “Disable Headers” checkbox. Click save.

The other thing you need to make sure is that your “From” email in WP Email Capture is the same email address you verified in step 2. In the settings page in the free version, or Lists > your chosen list in the Premium version, make sure the “From” email address is the same email address from step 2. Click save.

6. Test with your own Email Address to begin with
After setting up all of this, you will need to test with your own email address first. So find a page that contains the sign up box and fill in the details on that page, making sure that the “Email” field is the same email that has been verified in step 2. If you have received this okay, proceed to step 7.
7. Take Yourself out of Sandbox
As of right now, you are in sandbox mode – you can only send email to yourself. This is rather pointless if you are capturing emails as you would want to send email out to anybody who wants one. So you need to get out of sandbox mode.
To do this, a big blue button appears which should tell you that you are in sandbox mode and you need to get out of it. This requires an email to support. They provide a few fields for you to fill in, so for each of these fields, here is what you want to place.
- Service: SES Sending Limits
- Region: [The region you are using]
- Limit name: Desired Daily Sending Quota
- New limit value: [Whatever you want. I put 10 here as I’m only testing, but got 50,000!]
- Use case description: We are sending emails for our capture form running on WP Email Capture – https://en-gb.wordpress.org/plugins/wp-email-capture/
- Mail Type: Transactional
- Website URL: [Your Website URL]
- My email-sending complies with the AWS Service Terms and AUP: Yes
- I only send to recipients who have specifically requested my mail: Yes
- I have a process to handle bounces and complaints: Yes
Click send. Generally it takes 24 hours for it to arrive. You should receive a notification when done.
6. Test Again With Another Email Address
When done, be sure to test again with another email address, certainly one that isn’t verified like in step 2.
And that’s it! Following this you shouldn’t have any problems, and your emails will be coming through successfully.
If you have any problems or queries, please contact our support team.
Categories: Tutorials
Comments